How to Clean Unlacquered Brass? DIY Tips That Really Work
To clean unlacquered brass, start by wiping off dust with a soft cloth and wash it gently using mild soap and warm water.
Remove tarnish by applying a homemade paste of lemon juice and baking soda or a vinegar, salt, and flour mixture. Rinse thoroughly and dry completely to prevent corrosion.
Finally, buff with olive oil or apply a protective wax to maintain its natural patina. Learn how to refine techniques and prolong brass’s shine.
Key Takeaways
- Remove loose dirt and dust with a soft microfiber cloth or brush before cleaning unlacquered brass.
- Use homemade pastes like lemon juice with baking soda or a vinegar, salt, and flour mixture to gently remove tarnish.
- Rinse thoroughly with warm water and dry completely to prevent moisture-related corrosion.
- Apply olive oil or a protective wax after cleaning to create a barrier and preserve the brass finish.
- Avoid harsh chemicals and abrasive materials; always clean in a well-ventilated area with gloves for safety.
Unlacquered Brass and Its Characteristics
Unlacquered brass is an alloy primarily composed of copper and zinc that lacks a protective lacquer coating, leaving the metal surface directly exposed to air and moisture.
This exposure initiates oxidation, resulting in a natural patina that varies from warm gold to deep brown or greenish hues. You’ll notice this patina adds character and vintage charm, distinguishing it from shiny lacquered brass.
While unlacquered brass is durable and suitable for high-traffic use, it doesn’t maintain a glossy finish but rather a weathered, timeless look.
This living finish evolves over time, enhancing the metal’s unique appeal. You’ll find it requires less polishing since its patina is desirable.
Unlacquered brass offers lasting durability with a charming, weathered patina that embraces natural aging.
However, its unprotected surface is more prone to tarnishing and visible fingerprints, which can accelerate changes. Occasional maintenance prevents unwanted corrosion while preserving its aesthetic appeal.
Preparing Your Brass for Cleaning
Before you start cleaning your brass piece, conduct a thorough inspection to assess its condition and determine the appropriate cleaning approach.
Examine the surface for tarnish, corrosion, or damage, noting areas requiring deep cleaning versus light polishing. Identify if the brass is solid or plated, as methods differ. Test a small, hidden spot to verify cleaning won’t harm the finish.
Remove loose dirt using a soft microfiber cloth or brush, cleaning crevices gently with a soft-bristled toothbrush.
Use compressed air or a vacuum with a brush attachment for tight spaces. For intricate details, consider using a toothbrush with a mild abrasive like baking soda to ensure even cleaning.
Prepare a well-ventilated workspace, wear protective gloves, and protect surfaces with a soft cloth. Wash the brass gently with mild soap and warm water, rinse thoroughly, and dry completely before proceeding.
Effective Homemade Cleaning Solutions for Brass
Once your brass piece is properly prepared and free of surface dirt, you can apply homemade cleaning solutions tailored to remove tarnish effectively.
Combining acidic and abrasive ingredients creates ideal cleaning action. For example, lemon juice breaks down oxidation while baking soda or salt provides gentle abrasion to lift tarnish without damaging the metal.
You can choose from various formulations depending on your needs. Regular cleaning removes tarnish and prevents damage, maintaining the warm glow of brass.
- Lemon and Baking Soda Paste: Mix lemon juice with baking soda to form a spreadable paste. Apply, let sit 30 minutes, then gently rub and rinse.
- Salt and Vinegar Solution: Dissolve salt in vinegar for a liquid cleaner. Use a soft brush to apply and dissolve tarnish.
- Flour, Salt, and Vinegar Paste: Combine equal parts to create a thick paste for stubborn tarnish, applying uniformly for up to an hour.
Step-by-Step Cleaning Techniques for Unlacquered Brass
To ensure your unlacquered brass stays gleaming, follow the step-by-step techniques below:
Preparation and Tools
Although unclacquered brass requires careful handling, gathering the right preparation materials and tools guarantees effective cleaning without damage.
Begin by inspecting the brass to assess tarnish levels, then remove loose dirt using a soft microfiber cloth with mild soapy water.
Avoid abrasive or harsh chemicals to prevent surface damage. Always test cleaners on an inconspicuous spot first.
Use gloves to protect the metal from skin oils and prepare your workspace with separate cloths for washing, drying, and buffing.
Remember that unlacquered brass develops a unique patina when exposed to air and moisture, which adds character over time.
Key tools and materials include:
- Soft cloths (microfiber or lint-free cotton) and non-abrasive sponges or soft brass brushes
- Mild soap with warm water for initial washing and buffing cloths for polishing
- Gloves and small containers for homemade or commercial cleaning agents
This methodical preparation guarantees safe, efficient cleaning of your unclacquered brass items.
Cleaning and Finishing Steps
Apply cleaning pastes carefully to effectively remove tarnish from your unlacquered brass items.
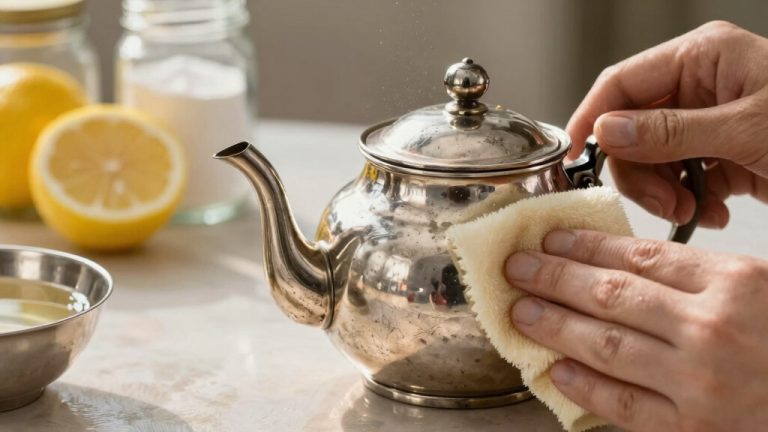
Begin by mixing lemon juice with baking soda or vinegar with salt to create a thick paste. Use a soft cloth to apply the paste evenly, concentrating on tarnished areas. Let it sit 10–15 minutes to break down oxidation.
Buff gently in circular motions to lift tarnish without scratching. Rinse thoroughly with warm water and dry immediately to prevent water spots or uneven patina. For stubborn discoloration, repeat or use a flour-based paste.
After cleaning, buff dry with a lint-free towel and apply a thin layer of natural oil, such as olive oil, to delay re-tarnishing.
Avoid abrasive tools and guarantee no cleaner residue remains. Store brass in a dry environment to slow oxidation.
Maintenance Tips to Keep Brass Shining
You should establish a regular care routine to preserve the beauty of unlacquered brass. Here are some simple yet effective habits to follow:
Weekly Cleaning Routine
When maintaining unlacquered brass weekly, start by dusting with a soft, lint-free cloth to remove surface dirt without causing scratches.
Next, wipe the surface gently with a cloth slightly dampened in liquid ammonia to sustain shine and minimize tarnish formation.
Use a soft toothbrush for intricate hardware details, avoiding abrasive tools that could damage the metal. Regularly inspecting the brass for signs of tarnishing helps catch early discoloration and buildup before it worsens.
After cleaning, apply a thin layer of olive oil or a natural mixture of olive oil and lemon juice to polish and protect the brass.
- Use mild, natural cleaning pastes (vinegar, salt, flour) for light tarnish; rinse and dry thoroughly.
- Avoid harsh abrasives and silicone-based polishes to prevent surface damage.
- Handle with clean, dry hands and store in cool, dry places to slow tarnish.
Preventing Tarnish Effectively
Several key practices help prevent tarnish on unlacquered brass, ensuring its shine endures over time.
Avoid harsh chemicals like ammonia, bleach, and abrasive cleaners that cause discoloration and surface damage. Instead, use mild solutions such as diluted vinegar or specialized brass cleaners applied with soft cloths to minimize abrasion.
Apply protective coatings like Renaissance Wax or mineral oil to form a barrier against moisture and pollutants. It is important to note that the patina acts as a protective layer, so maintaining it can be beneficial. Handle brass with clean, dry hands or gloves to prevent oil transfer.
Store pieces in low-humidity, controlled environments, and immediately dry any moisture after cleaning. Establish a routine maintenance schedule, adjusting frequency based on environmental conditions, and regularly inspect for early tarnish signs.
Precautions and Tools for Safe Brass Cleaning
Although unlacquered brass requires careful handling to maintain its integrity, using the right precautions and tools guarantees effective cleaning without damage.
Avoid harsh chemicals, abrasive pads, and strong undiluted ammonia or bleach to protect the surface. Always test cleaning solutions on a small area first.
Use soft, lint-free cloths and mild detergents diluted in warm water for gentle cleaning. Employ soft brushes or eco-friendly homemade pastes as needed, ensuring thorough rinsing and complete drying to prevent residue buildup and corrosion.
Over time, unlacquered brass will develop a natural patina that adds character and protects the surface.
Key precautions and tools include:
- Soft, non-abrasive cleaning materials like cloths and sponges
- Mild, diluted cleaning agents or natural homemade solutions
- Gloves and proper ventilation when handling chemical-based cleaners
Frequently Asked Questions
Can Unlacquered Brass Be Cleaned With Commercial Brass Polish?
Yes, you can clean unlacquered brass with commercial brass polish, but you need to choose products specifically formulated for unlacquered surfaces.
Apply the polish carefully using a soft cloth to avoid scratches. Follow the manufacturer’s instructions precisely, rinse thoroughly, and dry the brass afterward to prevent residue buildup.
How Often Should I Reseal Unlacquered Brass After Cleaning?
Think of resealing unlacquered brass like setting a timer on freshness. Typically, you’ll want to reseal every 6 to 12 months to prevent tarnish and corrosion. If your brass lives outdoors or in humid conditions, reseal more often—every 3 to 6 months.
Your maintenance routine and desired finish also matter: skip resealing if you prefer a natural patina. Always apply sealant on a clean, dry surface for best protection.
Is It Safe to Use Ultrasonic Cleaners on Unlacquered Brass?
Yes, you can safely use ultrasonic cleaners on unlacquered brass. The process employs cavitation bubbles at 30-37 kHz, effectively removing tarnish without damaging the surface.
Maintain bath temperatures between 30°C and 50°C and use mild acid-based solutions at about 10% concentration. Avoid abrasive methods; ultrasonic cleaning preserves intricate details and prevents annealing.
After cleaning, rinse with deionized water and dry at moderate heat to prevent spots or residue.
Can I Use Lemon Juice on Lacquered Brass Surfaces?
You shouldn’t use lemon juice on lacquered brass because its citric acid can damage the protective coating.
Acidic exposure risks peeling, clouding, or discoloration of the lacquer. Instead, opt for a mild soap and water solution or a pH-neutral brass cleaner specifically designed for lacquered surfaces.
Always test any cleaner on a hidden spot first and rinse thoroughly to minimize potential harm to the lacquer’s integrity.
What Causes Green Discoloration on Unlacquered Brass?
You’ll notice green discoloration on unlacquered brass because copper oxidizes when exposed to oxygen and moisture.
You’ll find that environmental factors like humidity, pollutants, and acid rain accelerate this process. You’ll also see skin acids and sweat react with copper, transferring green stains.
You’ll understand these green layers consist of copper hydroxides, carbonates, sulfates, and chlorides forming verdigris, which acts as a protective patina on the brass surface.
Clean Like a Pro: Let Your Brass Steal the Spotlight
Now that you’ve mastered cleaning unlacquered brass, you’ll tackle tarnish like a pro—no more dull, lifeless pieces. With your precise prep, homemade solutions, and step-by-step technique, your brass will gleam so brightly it might just blind your guests.
Keep up with maintenance, use the right tools, and you’ll turn every cleaning session into a flawless, efficient ritual. Your unlacquered brass will stay stunning, shining, and absolutely unstoppable.