How to Get Nail Polish off Tile: Safe & Effective Methods
To remove nail polish from tile, first let it dry to avoid spreading. Gently lift dried polish with a plastic card or butter knife.
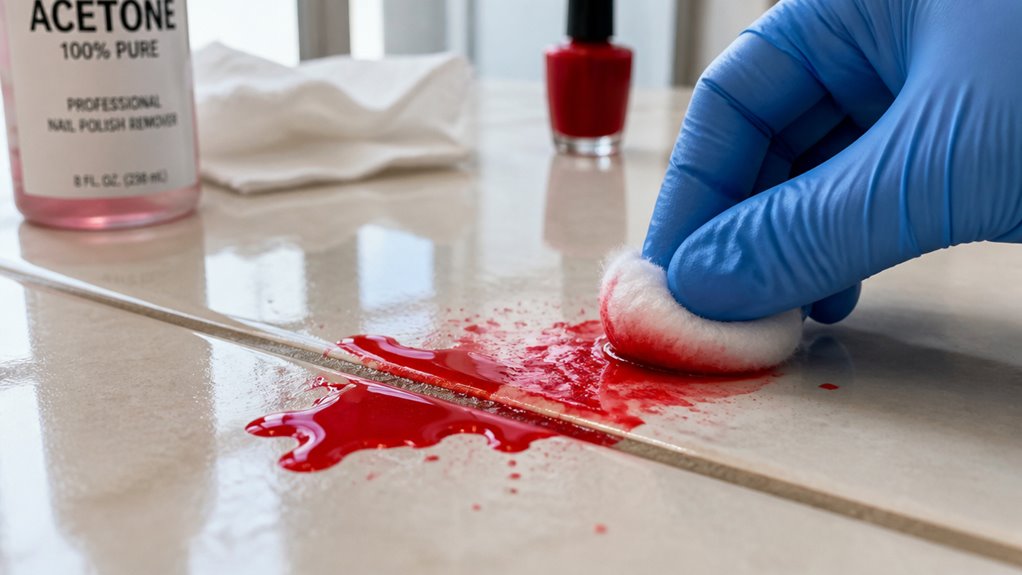
Then apply acetone with a cotton pad, testing a hidden spot first. Avoid grout contact to prevent discoloration.
For a grout-safe option, try a baking soda paste or hydrogen peroxide, but always test first.
Finish by rinsing thoroughly and drying the tile. You can explore safer tools and natural alternatives next for best results.
Key Takeaways
- Blot wet nail polish gently with a paper towel and use a plastic card edge to lift excess without spreading or rubbing into grout.
- Allow polish to dry fully before removal to prevent stain spreading and enable easier, controlled cleaning with solvents.
- Test acetone-based remover on a hidden tile spot, then apply carefully with a cotton pad, avoiding grout contact to prevent bleaching.
- Use a soft toothbrush and gentle scraping tools like a plastic scraper to mechanically remove dried polish without damaging tile or grout.
- Rinse the area thoroughly with water after cleaning, and dry completely while wearing gloves and ensuring good ventilation for safety.
How to Handle Wet Nail Polish Spills on Tile?

When you spill nail polish on tile, immediately blot up the excess with a clean paper towel to prevent it from spreading.
Avoid rubbing side-to-side, as that pushes the polish deeper into grout. Use the edge of a plastic card to carefully lift large puddles from the tile surface.
Next, contain the spill perimeter by placing paper towels around it to stop further migration.
Don’t apply any solvents or chemicals while the polish is still wet on the floor. That risks spreading and damage.
Focus on limiting the spill’s spread and removing as much wet polish as possible before moving to drying or chemical treatments.
Acting fast and carefully will make later cleaning steps easier and prevent permanent stains on your tile.
After initial cleanup, ensure thorough drying with a microfiber cloth to prevent moisture damage and prepare the surface for any further treatment, following best practices for moisture prevention.
Why You Should Let Nail Polish Dry Before Cleaning?
You really should let your nail polish dry before diving into any cleaning. Why? Well, if you clean too soon, you risk spreading that polish and making a bigger mess. Nobody wants that!
Once the polish is dry, it’s much easier to lift it off surfaces without pushing it deeper into grout or tile. Plus, giving it a little time allows the solvents to do their thing, breaking down the polish so it comes off more easily. So, just sit tight and let it dry for a bit!
For tougher stains, using appropriate cleaning solutions and techniques can help remove residue effectively without damaging your tile.
Preventing Stain Spread
Before tackling nail polish spills on tile, let the polish dry completely to prevent spreading the stain. If you try cleaning while it’s wet, you risk smearing the polish beyond the original spill, making the stain larger and harder to remove.
Start by blotting excess polish with a paper towel without rubbing, which only pushes the stain deeper. Use the edge of a plastic card to gently lift pooled polish, containing the spill with paper towels to stop migration.
Once dry, the polish becomes easier to scrape off in chunks without smearing. This controlled approach keeps the stain contained, protects grout lines, and prepares the surface for effective solvent application.
Patience at this stage saves you time and effort during the cleaning process.
Enhancing Solvent Effectiveness
Allowing nail polish to dry fully sharpens the effectiveness of solvents during removal. When polish is wet, applying solvents can spread the stain, making cleanup tougher.
Instead, blot excess polish immediately but don’t rub it. Let the remaining polish air dry completely before using any chemical treatments.
Once dry, gently scrape off any chunks with the edge of a butter knife to reduce residue. Dry polish allows solvents like acetone or rubbing alcohol to break down the stain more effectively without smearing.
It also prevents solvent dilution, ensuring stronger chemical action. Testing solvents on a hidden grout spot first helps avoid discoloration.
Always ensure proper ventilation when using chemical solvents to avoid inhaling harmful fumes, similar to precautions taken when cleaning melted plastic in ovens due to toxic fumes.
How to Remove Dried Nail Polish From Tile Safely?
When dealing with dried nail polish on tile, start by gently scraping off chunks using the edge of a butter knife to avoid scratching the surface.
Next, test any cleaning agent on a small, hidden grout spot to make certain no discoloration occurs.
Avoid aggressive tools that may damage the tile or grout.
To remove the polish safely, follow these steps:
- Peel away thin dried layers manually without force.
- Use a soft-bristled toothbrush for light scrubbing after applying mild cleaning agents.
- Wipe the area with a damp cloth and rinse thoroughly with water to remove residues.
Always use non-abrasive tools to protect the tile surface during cleaning.
Using Acetone-Based Nail Polish Remover on Tile
Before diving into using acetone-based nail polish remover, it’s a good idea to test it out on a hidden spot of your tile first. This way, you can make sure it won’t cause any damage.
When you’re ready to tackle that stain, grab a cotton pad and apply the remover carefully. Just hold it on the stain for a moment to let it soak in, then gently rub in a circular motion.
Oh, and a quick heads-up: steer clear of using acetone on unglazed or sensitive surfaces. You definitely want to avoid any damage while making sure you get that stain out effectively!
Always test treatments on a small, inconspicuous area for 10–15 minutes to check for surface damage before proceeding further.
Safe Application Practices
Although acetone-based nail polish remover is effective on tile, you must use it carefully to avoid damage.
Before applying, make sure the polish has fully dried and the area is free from excess polish to prevent spreading. Use acetone only on glazed ceramic or porcelain tiles to protect sensitive surfaces.
Follow these safe application practices:
- Apply acetone to a cotton pad, not directly on tile, and hold it on the stain for 10–30 seconds to soften polish.
- Rub gently in a circular motion to lift stains without scrubbing harshly, avoiding grout contact.
- Wipe residue promptly with a damp cloth, then rinse and dry the tile thoroughly to prevent chemical buildup.
Wear gloves and ensure good ventilation to protect yourself during use, as recommended in safe application practices.
Surface Compatibility Guidelines
Understanding which tile surfaces tolerate acetone-based nail polish remover helps you avoid damage during cleaning.
Use acetone only on glazed ceramic or porcelain tiles, as these surfaces resist harsh solvents without dulling or discoloration.
Avoid unglazed, natural stone, or vinyl tiles because acetone can strip finishes, cause etching, or leave permanent marks.
Always test the remover on a small, hidden area first to make certain no adverse reaction occurs.
When applying acetone, avoid contact with grout lines, especially colored grout, to prevent bleaching or color loss.
Use a cotton swab for precise application near grout.
For routine cleaning and protection of natural stone tiles, it is best to use pH-neutral cleaners that are safe for sealed surfaces rather than harsh solvents.
Effective Removal Techniques
Start by applying acetone-based nail polish remover directly to a cotton pad or cloth. Make sure you use only on glazed ceramic or porcelain tiles to avoid damage.
Hold the soaked pad on the stain for 10 to 30 seconds to soften the polish. Then, gently rub in a circular motion until the polish lifts. Avoid excessive scrubbing to protect the tile surface.
Follow these key steps for effective removal:
- Test the remover on a small, hidden tile area first to make certain no discoloration occurs.
- Use a plastic scraper or soft brush to lift softened polish without scratching.
- Wipe the area with a damp cloth and rinse thoroughly to remove residue.
This method safely dissolves polish without harming tile finish or grout. For persistent stains, consider using a baking soda and hydrogen peroxide paste as a gentle, grout-safe cleaning alternative.
Natural Nail Polish Removal Alternatives for Tile
Exploring natural alternatives for removing nail polish from tile can protect your surfaces from harsh chemicals while effectively lifting stains.
You can use baking soda paste, lemon juice, or hydrogen peroxide as gentle yet efficient options. These ingredients break down polish without damaging tile finishes.
Apply the chosen solution, let it sit for 10-15 minutes, then scrub lightly with a soft brush before rinsing thoroughly.
For best results, always perform a spot test to ensure the cleaning method is compatible with your tile’s surface properties and avoid potential damage to the finish from prolonged exposure or abrasive action, as advised in safe cleaning practices.
| Natural Remedy | Application Time | Effectiveness Level |
|---|---|---|
| Baking Soda Paste | 10-15 minutes | Moderate |
| Lemon Juice | 15-20 minutes | Moderate-High |
| Hydrogen Peroxide | 5-10 minutes | High |
| Oxygen Bleach | 10-20 minutes | High |
Choose based on stain severity and tile type to avoid damage while ensuring polish removal.
Protecting Colored Grout While Removing Nail Polish
When removing nail polish from tile, you need to take special care with colored grout to prevent discoloration or bleaching.
Removing nail polish from tile requires extra caution to protect colored grout from discoloration or bleaching.
Colored grout is sensitive to harsh chemicals, so applying solvents directly can damage its appearance. Protect it by limiting exposure and targeting only the affected tile surfaces.
Follow these steps to safeguard your grout:
- Apply solvents with a cotton swab or pad precisely on the nail polish stain, avoiding grout lines.
- Dampen grout with isopropyl solution before cleaning to reduce the harsh effects of acetone-based removers.
- Test all cleaning agents on a hidden grout spot first to ensure no color change occurs.
For regular maintenance and to avoid damage, consider using acid-free cleaners that are safe for colored grout and natural stone.
When and How to Use Hydrogen Peroxide and Bleach?
Although hydrogen peroxide and bleach are powerful cleaners, you should use them cautiously to avoid damaging your tile and grout. Always test on a small, hidden grout spot first.
Apply hydrogen peroxide to grout lines and let it sit for 5 to 10 minutes before scrubbing gently. For bleach, mix oxygen bleach powder with warm water to form a paste, apply it carefully, and rinse thoroughly to prevent discoloration.
Avoid using these on colored grout to prevent bleaching.
| Cleaner | Application Time | Usage Tip | Rinse Requirement |
|---|---|---|---|
| Hydrogen Peroxide | 5-10 minutes | Apply to grout lines only | Rinse well after use |
| Oxygen Bleach | 10-20 minutes | Use as paste on grout | Thorough rinse needed |
| Avoid on Colored Grout | N/A | Use cotton swab for precision | Prevents discoloration |
| Test First | Before full use | Apply on hidden spot | Confirm safety |
Tools and Tips for Scrubbing and Lifting Nail Polish
To lift nail polish effectively, start by choosing the right tools to avoid damaging your tile or grout. Use soft, non-abrasive items that gently remove polish without scratching surfaces. Avoid harsh scrubbing that can erode grout or dull tile glaze.
Focus on these essentials:
- Soft-bristled toothbrush – Ideal for scrubbing without causing harm, especially in grout lines.
- Plastic scraper or old credit card – Use to gently lift dried polish chunks without scratching.
- Cotton pads or swabs – Perfect for applying solvents precisely and controlling the area treated.
Work patiently with gentle, circular motions. Avoid aggressive scrubbing to preserve your tile’s finish while effectively lifting the polish.
How to Rinse and Dry Tile After Nail Polish Removal?
Completing the nail polish removal process means thoroughly rinsing and drying your tile to eliminate all chemical residues and prevent water spots.
Start by wiping the treated area with a clean, damp cloth to remove dissolved polish and solvent traces.
Begin by gently wiping the area with a clean, damp cloth to clear away dissolved polish and solvent residues.
Then, rinse the tile with clear water, ensuring no cleaning agents remain, especially on grout lines, to avoid discoloration.
Avoid flooding grout; instead, use minimal water for rinsing.
After rinsing, dry the tile completely using a dry towel or mop to prevent water spots and slipping hazards.
Make sure to absorb moisture from grout lines as well.
This final step protects your tile’s finish and keeps your floor safe and spotless after nail polish removal.
Frequently Asked Questions
Can Nail Polish Damage Different Types of Tile Surfaces?
Yes, nail polish can damage certain tile surfaces. You shouldn’t use acetone-based removers on porous or sensitive tiles like natural stone, as they can cause discoloration or surface etching.
Glazed ceramic or porcelain tiles handle acetone better, but always test first. To protect grout and colored tiles, apply solvents carefully with a cotton swab.
Avoid harsh scrubbing that can scratch or wear down tile finishes during cleanup.
How Long Does It Take for Nail Polish to Fully Cure on Tile?
Nail polish typically takes about 15 to 30 minutes to fully cure on tile surfaces, depending on thickness and environmental conditions like temperature and humidity.
You should wait until it’s completely dry and hard before attempting removal, as wet polish spreads easily.
To be safe, allow at least 30 minutes to make certain it’s fully cured. This helps you avoid smearing or pushing the polish deeper into grout or textured tile.
Are There Any Commercial Products Specifically for Tile Nail Polish Removal?
Yes, you can find commercial nail polish removers designed for tile surfaces, often labeled as “non-abrasive” or “safe for ceramics.”
These usually contain acetone or gentle solvents that won’t damage tile glaze. You can also use specialty grout cleaners with stain-removal formulas for tougher spots.
Always test any product on a hidden area first to avoid discoloration. Follow the manufacturer’s instructions carefully to protect your tile and grout.
What Precautions Should Pets Owners Take During Nail Polish Removal?
Better safe than sorry: keep pets away during nail polish removal.
Make sure good ventilation to avoid inhaling fumes, as acetone and other solvents can harm them.
Use pet-proof barriers or rooms to isolate the area.
Store all chemicals securely out of reach.
Clean up spills promptly to prevent accidental ingestion.
Finally, avoid applying solvents near pet bedding or feeding areas to protect their health throughout the process.
Can Repeated Nail Polish Spills Affect Tile Grout Durability?
Yes, repeated nail polish spills can weaken tile grout over time.
The solvents in nail polish and removers may cause grout to discolor, dry out, or erode, especially if it’s unsealed or colored.
You’ll want to clean spills promptly and avoid harsh chemicals to preserve grout integrity.
Regularly sealing grout can help protect it from damage caused by repeated exposure to nail polish and cleaning agents.
Keep Your Tile Spotless With Safe Cleaning Methods
Removing nail polish from tile doesn’t have to be a hassle.
Did you know acetone-based removers work on 95% of polish stains without damaging most tiles? Just remember to protect grout and test a small area first.
Whether you choose natural alternatives or stronger solutions like bleach, follow safe scrubbing and rinsing steps to keep your tile spotless.
With the right approach, you can tackle spills quickly and confidently every time.